Construction notes on the Super O El
First, for folks who want a REALLY realistic NYC El, take a look at New York City Model Transit System by Joseph Frank It's fairly incredible but more detailed than I have the skills to take on.
Equally realistic are layout pictures found at the New York City Model Transit Association website. Again, beyond what I'm able to do, (to put it mildly), but the work is first-rate. (and a 3-track system)
Here is the info for my much-simplified 2-track version:
The plans I worked from are at http://www.nycsubway.org/articles/en_ch13.html these are full specifications and drawings from 1914 for the New York City elevated lines. With these in hand it's possible to create something as detailed and accurate -- or basic -- as one wishes.
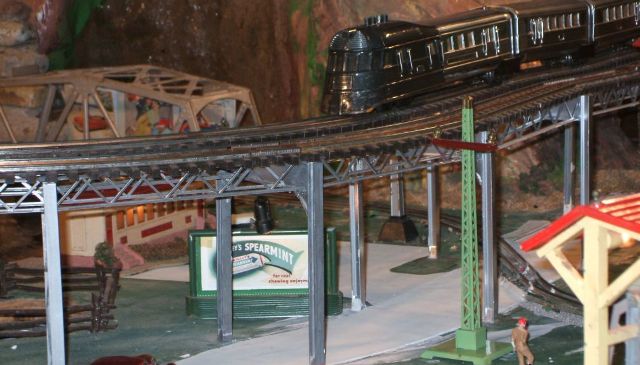
I took liberties. Horizontal cross beams in the plan are 5' or 6' wide. Mine are 4 scale feet as that's what was readily available in scale plastic girders. The NYC plans are for a 3-line system with 26' centers on the vertical columns spanning streets. My 2-line version has the columns on 5-3/8" centers (or 21-1/2 scale feet). The NYC elevated uses solid plate trusses for the long stringers (under the track) between support "arches". Mine uses open web trusses as they were cheaper to buy, and it saved me hours in modeling correct seams, rivets, etc. in the real ones. I also liked the open truss look. They also have the added advantage of sitting neatly on top of the open edges of the upper and lower I-beam girders instead of having to notch-out the solid trusses... With those disclaimers as to authenticity:
I ordered all the girders from Plastruct: http://www.plastruct.com/. They make this stuff for movie miniatures and the like -- and aren't cheap. The materials for my El set me back a bit over $900, but they're easy to use, and quite realistic. What I used:
B-32: 3/8" x 1" I beams for 5" horizontal beams on main supports. This gets 3 beams out of a 15" plastruct girder (for economy) but makes the entire support only 5-3/4 wide (once you attach the vertical beams to the sides). Running the ties of super-o right to the edge of the supports leaves just barely enough room for my Flying Yankee to clear an adjoining train on curves. If you're planning on running anything like a Class J Northern that requires some real room, you'll need to design with a wider cross beam, either moving the supports further apart (glued to the ends) or, more work, leaving the vertical support beams 5" apart (20 scale feet), and glue them to the bottom of the I-beam using corner brackets on both sides. The NYC El uses both methods.
H-12: 3/8" H beams for the columns. I cut these to 7" and glued them on the outside edges of the I-beams. With the I-beams being 1" that leaves 6" clear for trains, etc. passing under, which should be plenty.
OTS-32: 1" open web truss for the stringers under the rails. I attached 4 of these between each support "arch". One sits directly under each rail of each track (That makes one sit right where the I beam attaches to the H beam, and another 1-1/4" in from that on each side.)
BM-12: Base mount for each support column
Q-Car Company: (http://www.qcarcompany.com/)
CS397: El Structure Corner Brace, Contract II: These corner braces not only give a nice finished appearance, but they add a lot to the structural integrity of the whole mess.
The length of my spans between support 'arches' varied widly. On straight, open spaces, I had as much as a 15" span. On full curves, more than 5 or6 inches of span got the trusses too far away from the rails. In spots where I had to cross over a highway or another rail line at an angle, I occasionally had to make the 'arch' witdths as much as 10 or 11 inches. In short, it was pretty much a build-to-fit project. I made up a bunch of 5-3/4 wide x 7" high 'arches' with styrene cement, painted them, and propped them up with super o track sitting on them until I got the spans right. I then glued down the arches with Elmer's. I prepainted the trussesand measured each individually and cut them to length, lifting the the track just enough to work the truss into place and super-glue it in place. (Yes, one has to dry completely before you can put the next one on...) I made sure everything was OK, then super-glued the track down to the trusses. This may seem a little extreme track-wise <g>... But when I needed to make a change or two, the super-glue gives way without much force allowing me to replace track if necessary.
Mine is sort of the quick-and-dirty version, but my time to work on the layout is limited (and my patience for working with small plastic parts with glued-together fingers even more limited...) And I was really quite proud of the whole thing once I stopped swearing.
N.B: This whole arrangement works well with light-weight prewar/postwar rolling stock. Heavy modern scale engines however, cause too much bend in the track and open trusses. If you want your construct to be solid enough for heavy stock, I'd recommend going with solid girder trusses for the long spans between arches.
I included a little scale drawing of the support arches below in case the above notes aren't entirely clear Good luck...
